Nested Views, Routing, And Deep Linking With AngularJS

Out of the box, AngularJS gives you routing and the ngView directive. With these two features, you have the ability to map routes onto templates that get rendered inside of the ngView container. This works for simple, one-dimensional web sites; but, unfortunately, if you have a site that requires deep routing, AngularJS leaves you up to your own devices. In order to achieve deep routing, I've found it more useful to map routes onto action variables rather than templates; this gives you a great degree of flexibility and makes creating nested, independent views much easier.


When I think about rendering a page in an AngularJS application, I think in terms of two parallel concepts:
  • Request Context
  • Render Context
The Request Context is the result of route mapping. The request context contains the route parameters and the "action" onto which the route was mapped. The action variable is a dot-delimited list of values that tells the rendering engine which templates to render. In the "Adopt-a-Pet" demo, for example, the action value for a pet's medical history is this:
standard.pets.detail.medicalHistory
Each item in the action list represents a view within the page that [generally speaking] has a corresponding controller instance.
Graphically, you can think about the relationship between the Request Context and the Render Context as such:


 AngularJS routing using Request Context and Render Context.
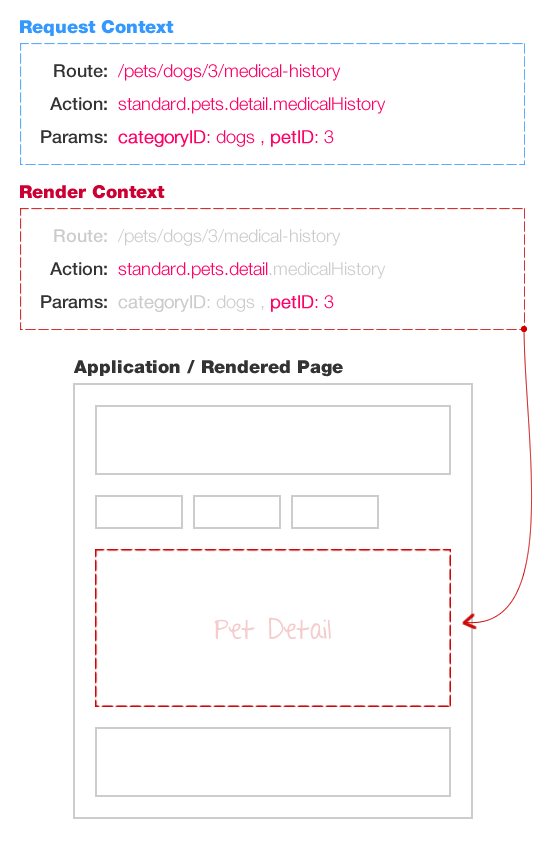
The Render Context is the portion of the Request Context that pertains to a given, nested view. Because the Render Context is a subset of the Request Context, the render context doesn't necessarily need to react to all changes in the Request Context. In fact, the Render Context only needs to react when relevant portions of the Request Context change.
A stripped-down Controller instance would look like this:
1234567891011121314151617181920212223242526272829303132333435363738394041424344454647484950515253545556575859606162636465666768697071
(function( ng, app ){
"use strict";
app.controller(
"pets.detail.DetailController",
function( $scope, requestContext, _ ) {
// ...
// Other methods defined here.
// ...
// Get the render context local to this controller (and relevant params).
var renderContext = requestContext.getRenderContext( "standard.pets.detail", "petID" );
// --- Define Scope Variables. ---------------------- //
// Get the relevant route IDs.
$scope.petID = requestContext.getParamAsInt( "petID" );
// The subview indicates which view is going to be rendered on the page.
$scope.subview = renderContext.getNextSection();
// --- Bind To Scope Events. ------------------------ //
// I handle changes to the request context.
$scope.$on(
"requestContextChanged",
function() {
// Make sure this change is relevant to this controller.
if ( ! renderContext.isChangeRelevant() ) {
return;
}
// Get the relevant route IDs.
$scope.petID = requestContext.getParamAsInt( "petID" );
// Update the view that is being rendered.
$scope.subview = renderContext.getNextSection();
// If the relevant ID has changed, refresh the view.
if ( requestContext.hasParamChanged( "petID" ) ) {
loadRemoteData();
}
}
);
// --- Initialize. ---------------------------------- //
// Load the "remote" data.
loadRemoteData();
}
);
})( angular, Demo );
view rawcontroller.js hosted with ❤ by GitHub
As you can see, the "render context" for the given controller involves the action path, "standard.pets.detail" and the route param, "petID". A render context can listen to any portion of the action as well as any subset of route parameters. When the request context changes, the application controller broadcasts the "requestContextChanged" event. The controller listens for this event and checks to see if the change is relevant to the current "render context":
123456
// Make sure this change is relevant to this controller.
if ( ! renderContext.isChangeRelevant() ) {
return;
}
view rawcontroller-misc.js hosted with ❤ by GitHub
If the request context change is relevant to the given render context, the Controller may choose to take action (such as reloading any remote data relevant to the rendered view).
If you look at the code, you can see that the renderContext instance exposes the method, getNextSection(). This method returns the next value in the action chain, relative to the render context. So, for example, if the route action was:
standard.pets.detail.medicalHistory
... and the render context location was:
standard.pets.detail
... a call to getNextSection() would return, "medicalHistory." This ability to see the next action in the action path allows the relevant view to figure out which subview to render (if there are any).
A stripped-down View would then look like this:
123456789101112131415161718
<div ng-controller="pets.detail.DetailController">
<!-- More code here. -->
<!-- Include SubView Content. -->
<div ng-switch="subview">
<div ng-switch-when="background" ng-include=" ... "></div>
<div ng-switch-when="diet" ng-include=" ... "></div>
<div ng-switch-when="medicalHistory" ng-include=" ... "></div>
</div>
<!-- More code here. -->
</div>
view rawview.htm hosted with ❤ by GitHub
As you can see, we use the ngSwitch and ngSwitchWhen directives to render the appropriate subview based on the render context.
I've only been using this approach for a few months; but so far, I've been extremely pleased with the results. This Request Context / Render Context construct allows Controllers to change only when they need to, and no more. Furthermore, I believe it helps you think about Controllers as decoupled instances that rely more on the route data and less so on the inherited data. While this can call for some redundant data collection, it greatly simplifies your rendering logic.

Mapping AngularJS Routes Onto URL Parameters And Client-Side Events

Earlier this week, I talked about mapping RESTful resource URIs onto URL parameters and server-side events. When developing a thick-client application, much of the same URL routing functionality is required on the client. Only, with the ever-growing complexity of rich user interfaces, routing and partial page rendering on the client becomes much more difficult. Lately, I've been looking at Google's AngularJSas a declarative framework for client-side applications. And, as a follow-up to yesterday's post, I thought I would look at mapping AngularJS routes onto client-side URL parameters and rendering events.


AngularJS comes with a fairly robust routing and history management mechanism. Out of the box, it supports both hash-based routing as well as HTML5 push-state (I've only played with hash-based routing). The route provider is primarily concerned with mapping routes onto template paths and is configured with a series of when() method calls:
123456
$route.when(
"/friends/:friendID",
{
templateUrl: "views/friend-detail.htm"
}
);
view rawmisc_angular_1.js hosted with ❤ by GitHub
In the above case, the given route causes the given template to be rendered in an "ng-view" AngularJS directive. This approach is great for smaller websites and shallow web applications; but, when you have nested navigation and complex interfaces, the route-to-partial paradigm can quickly become quite limiting.
Fortunately, you don't have to use templates with routes. Instead, you can use routing to resolve client-side render events. In the same way that I resolved resource URIs onto server-side events, we can resolve client-side routes onto a hierarchy of values that defines the state of the rendered page.
The trick to this is understanding that the hash used to define the AngularJS route can contain any arbitrary data (so long as it doesn't conflict with some reserved values). So, for example, rather than passing in a templateUrl, we can pass in event data:
123456
$route.when(
"/friends/:friendID",
{
event: "friends.view"
}
);
view rawmisc_angular_2.js hosted with ❤ by GitHub
In this case, we are mapping the route onto the render event "friends.view". This event parameter will then be exposed as part of the $route state. The ":friendID" value, in the route, will also be exposed as part of the $routeParams state.
To see how this can be used to render a page, I've created a light-weight demo with a single Controller that conditionally renders content based on the route-provided render-event.
123456789101112131415161718192021222324252627282930313233343536373839404142434445464748495051525354555657585960616263646566676869707172737475767778798081828384858687888990919293949596979899100101102103104105106107108109110111112113114115116117118119120121122123124125126127128129130131132133134135136137138139140141142143144145146147148149150151152153154155156157158159160161162163164165166167168169170171172173174175176177178179180181182183184185186187188189190191192193194195196197198199200201202203204205206207208209210211212213214215216217218219220221
<!doctype html>
<html ng-app="Demo" ng-controller="AppController">
<head>
<meta charset="utf-8" />
 
<title>AngularJS Routing</title>
 
<style type="text/css">
 
a {
color: #333333 ;
}
 
a.on {
color: #CC0000 ;
font-weight: bold ;
text-decoration: none ;
}
 
</style>
</head>
<body>
 
<h1>
AngularJS Routing
</h1>
 
<p>
Current Render Action:
 
<!--
We're going to bind the content of the Strong element to
the scope-level model, renderAction. Then, when this gets
set in the Controller, it will be updated here.
-->
<strong ng-bind="renderAction">Unknown</strong>
</p>
 
<!--
For the navigation, we'll be conditionally adding the "on"
class based on the state of the current scope.
-->
<p>
<a href="#/home" ng-class="{ on: isHome }">Home</a> -
<a href="#/friends" ng-class="{ on: isFriends }">Friends</a> -
<a href="#/contact/ben" ng-class="{ on: isContact }">Contact</a>
</p>
 
<!--
When the route changes, we're going to be setting up the
renderPath - an array of values that help define how the
page is going to be rendered. We can use these values to
conditionally show / load parts of the page.
-->
<div ng-switch on="renderPath[ 0 ]">
 
<!-- Home Content. -->
<div ng-switch-when="home">
 
<p>
This is the homepage content.
</p>
 
<p>
Sub-path: <em>{{ renderPath[ 1 ] }}</em>.
</p>
 
</div>
 
<!-- Friends Content. -->
<div ng-switch-when="friends">
 
<p>
Here are my friends!
</p>
 
<p>
Sub-path: <em>{{ renderPath[ 1 ] }}</em>.
</p>
 
</div>
 
<!-- Contact Content. -->
<div ng-switch-when="contact">
 
<p>
Feel free to contact me.
</p>
 
<p>
Sub-path: <em>{{ renderPath[ 1 ] }}</em>.
</p>
 
<p>
Username: <em>{{ username }}</em>
</p>
 
</div>
 
</div>
 
 
<!-- Load AngularJS from the CDN. -->
<script
type="text/javascript"
src="//ajax.googleapis.com/ajax/libs/angularjs/1.0.2/angular.min.js">
</script>
<script type="text/javascript">
 
 
// Create an application module for our demo.
var Demo = angular.module( "Demo", [] );
 
// Configure the routing. The $routeProvider will be
// automatically injected into the configurator.
Demo.config(
function( $routeProvider ){
 
// Typically, when defining routes, you will map the
// route to a Template to be rendered; however, this
// only makes sense for simple web sites. When you
// are building more complex applications, with
// nested navigation, you probably need something more
// complex. In this case, we are mapping routes to
// render "Actions" rather than a template.
$routeProvider
.when(
"/home",
{
action: "home.default"
}
)
.when(
"/friends",
{
action: "friends.list"
}
)
.when(
"/contact/:username",
{
action: "contact.form"
}
)
.otherwise(
{
redirectTo: "/dashboard"
}
)
;
 
}
);
 
 
// -------------------------------------------------- //
// -------------------------------------------------- //
 
 
// Define our root-level controller for the application.
Demo.controller(
"AppController",
function( $scope, $route, $routeParams ){
 
// Update the rendering of the page.
render = function(){
 
// Pull the "action" value out of the
// currently selected route.
var renderAction = $route.current.action;
 
// Also, let's update the render path so that
// we can start conditionally rendering parts
// of the page.
var renderPath = renderAction.split( "." );
 
// Grab the username out of the params.
//
// NOTE: This will be undefined for every route
// except for the "contact" route; for the sake
// of simplicity, I am not exerting any finer
// logic around it.
var username = ($routeParams.username || "");
 
// Reset the booleans used to set the class
// for the navigation.
var isHome = (renderPath[ 0 ] == "home");
var isFriends = (renderPath[ 0 ] == "friends");
var isContact = (renderPath[ 0 ] == "contact");
 
// Store the values in the model.
$scope.renderAction = renderAction;
$scope.renderPath = renderPath;
$scope.username = username;
$scope.isHome = isHome;
$scope.isFriends = isFriends;
$scope.isContact = isContact;
 
};
 
// Listen for changes to the Route. When the route
// changes, let's set the renderAction model value so
// that it can render in the Strong element.
$scope.$on(
"$routeChangeSuccess",
function( $currentRoute, $previousRoute ){
 
// Update the rendering.
render();
 
}
);
 
}
);
 
 
</script>
 
</body>
</html>
view rawindex.htm hosted with ❤ by GitHub
In this demo, our application controller is listening for changes to the route. When a route is changed (also fires when page loads for the first time), the AppController extracts the route-mapped "action" value and injects it into the scope of the page. This value (and its derivative, renderPath) is then used to conditionally render the page using "ng-switch" directives.
Right now, this page has only one level of nesting. But, ng-switch directives can easily be nested in order to allow for deep-linking of your application. Furthermore, the "ng-switch-when" directive can be combined with the AngularJS "ng-include" directive to lazy-load page partials:
1234567
<div ng-switch on=" renderPath[ 0 ]">
 
<div ng-switch-when="home" ng-include=" 'home.htm' "></div>
<div ng-switch-when="friends" ng-include=" 'friends.htm' "></div>
<div ng-switch-when="contact" ng-include=" 'contact.htm' "></div>
 
</div>
view rawmisc_angular_3.htm hosted with ❤ by GitHub
On the server-side, events tend to map to resources and the access / mutation of those resources. In a rich, client-side application, however, events are a different beast. Rather than mapping to resources, they map to page state. And, depending on the complexity of your user interface, state may be defined as a complex hierarchy of sections. Fortunately, AngularJS routes make it possible to map routes onto render events which can then be used to drill down through a rendered page.